Altered Books - I really love to make them. Here is the latest video on youtube on how to make an altered Book Niche.
Hope you enjoy this. I have more on my website - at Terri Sproul.com
and you can check out my Youtube Channel for even more videos.
Leave me some love please. I really enjoy hear your comments...
TTFN
Terri Sproul
Tuesday, December 21, 2010
Tuesday, December 14, 2010
FaveCraft Blog Hop

I Love blog hops. These are one of my favorite thing to do here on my blog. Beside Videos. Thanks so much for join me here today.. hope you stop back soon and become a follower of my blog.

Supply List
Tag - make for buy one - Need to learn how to make a tag. See my "how To" video on Youtube
Stamps: Scrolls Work "snowman quote", Hero Arts "Swirls", Tim Holtz's Snowman, Small Snowflake (unknown),
Memories Mists: Blue and purple
bottle cap
ribbon: small red and fiber for the top
Crystal Lacquer
White embossing powder, embossing ink
wire for the snowman's arms - or you can leave the arms on the snowman...
Glue Dots: Pop-up and the new Micro dots...
snowflake charm
PPA from UsArtquest

Start by spray two different shade of Memories Mists from Stewart Superior. I used a blue and purple Mists.
Then I stamp the "Swirl" stamp using my embossing ink and embossed with white embossing powder. If you don't know how to emboss - I have a How to video on my website. Click here to get there. it's in the studio page. Please check out all my how to video - I have about 30 of them...
Next I add some glitter to the whole tag. I used my PPA from UsArtQuest. I used my finger to paint the PPA on the whole tag then sprinkled on the glitter. set aside to dry...
 Sorry this photo is blurry. I did not notice untile I post to my computer. and that's just too late to take a second photo. Sorry again... Stamp your snow man with blue ink, cut out the image. I used a black pen to add a little details to the snowman. I used a little ribbon for his scarf and wire for the arms.... Glue Dots has Micro Dot's now and they are perfect for the ribbon.
Bottle Cap. First off you need to smash the cap. I use my Sizzix machine to do this. But you can use a rubber hammer - or just give to your husband tell him to do it..
Then I stamps a small snowflake onto white cardstock and punched out with a circle punch. A one inch circle punch work great.
Adhere your circle snowflake to the bottom of the bottle cap. I use Crystal Lacquer to adhere the cardstock to the bottom of the cap. Just a small amount is all you need. give this about 10 minute to dry a little

after your embellishments (bottle cap) as dried for a few minutes. Add more 3-D Crystal Lacquer to the top of the snowflake. While your Crystal Lacquer is still wet add a little clear glitter. set aside to dry. this will take about 45 minutes or so...
When using Crystal Lacquer I start on the edges of the piece and fill in the center.
I stamped the snowman quote from Scrolls Work stamps onto white cardstock and cut the word out.Now its time to start adhere together. I used Glue Dots - Pop up for the snowman and the bottle cap.
I used Glue Dots NEW micro dots to adhere the small word from the snowman quote.
add your fiber and snowflake charm.

Here is a second tag I made this week. This one is really sweet. All the stamps (SantaMoon, and Dec 25th) are both from Scrolls Work Stamps. The list I made from hand, but a small piece of paper with black pen names. Ink the edge to look like it's been well loved by Santa. I used this amazing new product called "Sparkly Fluff" on Santa Hat, I have been having problem with this product. But Tim Holtz just used it in one of his project and he used Acrylic Paint to adhere it. I painted the hat with Red Acrylic Paint and while the paint was still wet I added the "Sparkly Fluff". and it's work well Thanks Tim Holtz! I painted the SantaMoon with Twinkling H2o's except for his hat.
Now Hop back the Favecraft and see all the other amazing project that are post. but please become a follower of mine stop back soon. lots of exciting stuff going on in my life soon.. Can't tell yet, but soon... Has to do with CHA winter show this upcoming year...
If you love Christmas Cards and Tag. for 2011 I will be hosting a Blog Hop with many other designer here on this blog. Called "Festive Fridays" on the 2nd an 4th Friday of each month in the year of 2011 there will be a blog hop going on here. All christmas cards or tags. You can join in on this blog hop if you like. Just send me a email and let me know you would like to play with us. My email is Terri@ultiamtescrapbookretreat.com If you join in or just stop by to see what we made. You can have 24'sh different cards made by December. That's the goal... Hope you think about join my blog hop next year...
TTFN
Terri Sproul
Monday, December 13, 2010
My Studio
Here is my studio - one of my favorite places to be - beside Disneyland. LOL. My home in the mountains in very small and i changed the second bedroom into my studio. As most of your know it's just me and my husband and lots of cats...
My studio is small - but i can just sit in the middle of the room and swivel around to anything in the room... LOL

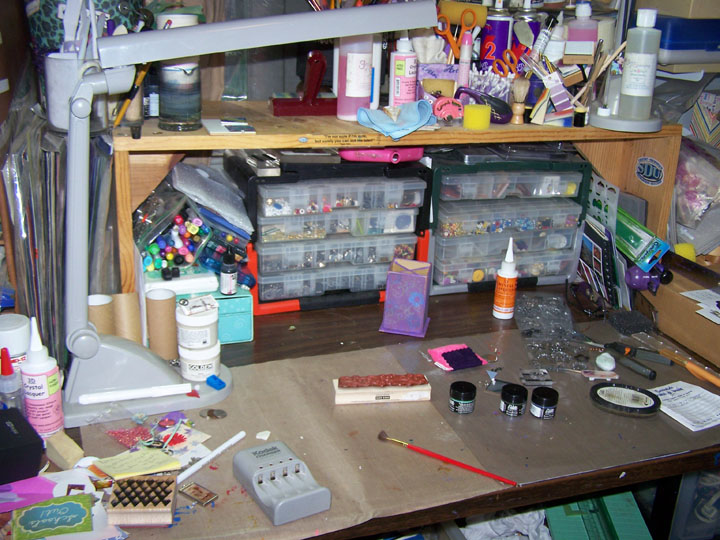
This photo is just over my desk top. i have lots of storage everywhere. I have too much stuff.. well not really. LOL
 Here is my desk top. There is lots of room here in this photo. I normally only have about a 3" x 3" section to play. I do believe a clean desk is a sign of a sick mind. My mind is NOT sick. LOL

This is my paper stash.... Love my paper...

this is the wall i keep some of my projects...
well I hope you enjoyed the little tour of my studio. Love to hear about yours....
TTFN
Terri Sproul
My studio is small - but i can just sit in the middle of the room and swivel around to anything in the room... LOL

This photo is just over my desk top. i have lots of storage everywhere. I have too much stuff.. well not really. LOL
 Here is my desk top. There is lots of room here in this photo. I normally only have about a 3" x 3" section to play. I do believe a clean desk is a sign of a sick mind. My mind is NOT sick. LOL
This is my paper stash.... Love my paper...

this is the wall i keep some of my projects...
well I hope you enjoyed the little tour of my studio. Love to hear about yours....
TTFN
Terri Sproul
Friday, December 10, 2010
Tuesday, December 7, 2010
"Wishes for your birthday"
Here is a fun little booklet I made. This would be a great gift for a young girl for her Birthday!

 2) My paper is only pattern on one side – so I spray the white side of my pattern paper with Memories Mists, Cherry Smoothie. You do not see the Memories Mists in these photos.


remember if you ever have a question - just let me know.. I will do my best to answer
I wrote this blog post while participating on the Glue Dots design Team....
Wishes for your birthday
By Terri Sproul
Supply List:

Ink: Memories Chalk “Gingerbread”,
Memories Mist: “cherry Smoothie”
Paper: K&Company: Studio K 9 Stitched – all the paper is from this grouping
Glue Dots®: Lines, Craft, Poster, Micro,
Vellum Quotes
Eyelets or brads – if you use eyelet you will need an eyelet setter
Lots of Ribbons
Buttons
Bottle Cap with gear ephemera and Crystal Lacquer
Sticker Letter, words, embellishments
Rub-on words
Stapler: I used Tim Holtz Mini stapler (but you can use any stapler you have in the house)
Balloon Punch
Small tag punch – but you can hand cut tags
1) Fold 12” x 12” paper in half, fold in half the other way. Fold one side into 4th. Accord fold. You end up with a booklet that 6” x 12” with four pockets. You can make this project with different size papers. I have done with 8 ½” x 11” paper many times.

 2) My paper is only pattern on one side – so I spray the white side of my pattern paper with Memories Mists, Cherry Smoothie. You do not see the Memories Mists in these photos.
3) Rip first section – from top left side to bottom right side. 2nd Section: Punch with Circle punch – only punch ½ of the circle at the top to make a whole for you tag to be easy removed. 3rd Section: Do the same as the circle but with a square punch (or another space you can think of). 4th Section: Cut about 1 ½” down the inter seam and fold down twice. Adhere your folds with Glue Dots®.

Rip the first section - from the top right corner to the bottom left hand side.

2nd and 3rd section: Punch a Circle and Square on the top. See how the punch is in upside down and only 1/2 way.

4) Ink all edges with Memories Chalk Ink “Gingerbread”.
5) The embossed Square pattern paper – first I sand the whole paper to give bring out the embossed images more, then I ink the edges some…
6) Make 4 Tags – Just a hair under 3” x 6” tags. Or the size you need to fix into your pockets…


7) At this point I just started to have fun. I cut up the embossed Square Pattern paper to add to the inside of my project. Added lots of Rub-on words, sticker and vellum – adhere with my Glue Dots®


remember if you ever have a question - just let me know.. I will do my best to answer
I wrote this blog post while participating on the Glue Dots design Team....
Monday, December 6, 2010
Holiday Give-a-Way
Want to let you guys know about a give-a-way from ClearSnap.

Have a great Holiday
TTFN
Terri Sproul
Have a great Holiday
TTFN
Terri Sproul
Sunday, December 5, 2010
New Blog
I have started a new blog for Sakura Hobby and Crafts the home of 3-D Crystal Lacquer. Love this stuff. we will have some exciting news come soon. So please become a follower so you don't miss out on this news...
here is the link to the blog... Crystal Lacquer I hope you bookmark this site and become a follower
Do you have Crystal Lacquer in your studio. Here is where you can purchase. Click Here
Please tell and friends about this new blog and leave me a comment that you are now a follower and who you referred and you will have a chance to win some Blog Candy... Free Stuff! love Free Stuff...
You need to be a follower and referrer a friend as a follower to be entered... Wait to you see what I will send you! this is almost as exciting as the news I have coming soon...
Well can't wait to send out some free stuff and read all the comments on how much you love this stuff...
TTFN
Terri Sproul
Subscribe to:
Posts (Atom)