Altered Books - I really love to make them. Here is the latest video on youtube on how to make an altered Book Niche.
Hope you enjoy this. I have more on my website - at Terri Sproul.com
and you can check out my Youtube Channel for even more videos.
Leave me some love please. I really enjoy hear your comments...
TTFN
Terri Sproul
Tuesday, December 21, 2010
Tuesday, December 14, 2010
FaveCraft Blog Hop

I Love blog hops. These are one of my favorite thing to do here on my blog. Beside Videos. Thanks so much for join me here today.. hope you stop back soon and become a follower of my blog.

Supply List
Tag - make for buy one - Need to learn how to make a tag. See my "how To" video on Youtube
Stamps: Scrolls Work "snowman quote", Hero Arts "Swirls", Tim Holtz's Snowman, Small Snowflake (unknown),
Memories Mists: Blue and purple
bottle cap
ribbon: small red and fiber for the top
Crystal Lacquer
White embossing powder, embossing ink
wire for the snowman's arms - or you can leave the arms on the snowman...
Glue Dots: Pop-up and the new Micro dots...
snowflake charm
PPA from UsArtquest

Start by spray two different shade of Memories Mists from Stewart Superior. I used a blue and purple Mists.
Then I stamp the "Swirl" stamp using my embossing ink and embossed with white embossing powder. If you don't know how to emboss - I have a How to video on my website. Click here to get there. it's in the studio page. Please check out all my how to video - I have about 30 of them...
Next I add some glitter to the whole tag. I used my PPA from UsArtQuest. I used my finger to paint the PPA on the whole tag then sprinkled on the glitter. set aside to dry...
 Sorry this photo is blurry. I did not notice untile I post to my computer. and that's just too late to take a second photo. Sorry again... Stamp your snow man with blue ink, cut out the image. I used a black pen to add a little details to the snowman. I used a little ribbon for his scarf and wire for the arms.... Glue Dots has Micro Dot's now and they are perfect for the ribbon.
Bottle Cap. First off you need to smash the cap. I use my Sizzix machine to do this. But you can use a rubber hammer - or just give to your husband tell him to do it..
Then I stamps a small snowflake onto white cardstock and punched out with a circle punch. A one inch circle punch work great.
Adhere your circle snowflake to the bottom of the bottle cap. I use Crystal Lacquer to adhere the cardstock to the bottom of the cap. Just a small amount is all you need. give this about 10 minute to dry a little

after your embellishments (bottle cap) as dried for a few minutes. Add more 3-D Crystal Lacquer to the top of the snowflake. While your Crystal Lacquer is still wet add a little clear glitter. set aside to dry. this will take about 45 minutes or so...
When using Crystal Lacquer I start on the edges of the piece and fill in the center.
I stamped the snowman quote from Scrolls Work stamps onto white cardstock and cut the word out.Now its time to start adhere together. I used Glue Dots - Pop up for the snowman and the bottle cap.
I used Glue Dots NEW micro dots to adhere the small word from the snowman quote.
add your fiber and snowflake charm.

Here is a second tag I made this week. This one is really sweet. All the stamps (SantaMoon, and Dec 25th) are both from Scrolls Work Stamps. The list I made from hand, but a small piece of paper with black pen names. Ink the edge to look like it's been well loved by Santa. I used this amazing new product called "Sparkly Fluff" on Santa Hat, I have been having problem with this product. But Tim Holtz just used it in one of his project and he used Acrylic Paint to adhere it. I painted the hat with Red Acrylic Paint and while the paint was still wet I added the "Sparkly Fluff". and it's work well Thanks Tim Holtz! I painted the SantaMoon with Twinkling H2o's except for his hat.
Now Hop back the Favecraft and see all the other amazing project that are post. but please become a follower of mine stop back soon. lots of exciting stuff going on in my life soon.. Can't tell yet, but soon... Has to do with CHA winter show this upcoming year...
If you love Christmas Cards and Tag. for 2011 I will be hosting a Blog Hop with many other designer here on this blog. Called "Festive Fridays" on the 2nd an 4th Friday of each month in the year of 2011 there will be a blog hop going on here. All christmas cards or tags. You can join in on this blog hop if you like. Just send me a email and let me know you would like to play with us. My email is Terri@ultiamtescrapbookretreat.com If you join in or just stop by to see what we made. You can have 24'sh different cards made by December. That's the goal... Hope you think about join my blog hop next year...
TTFN
Terri Sproul
Monday, December 13, 2010
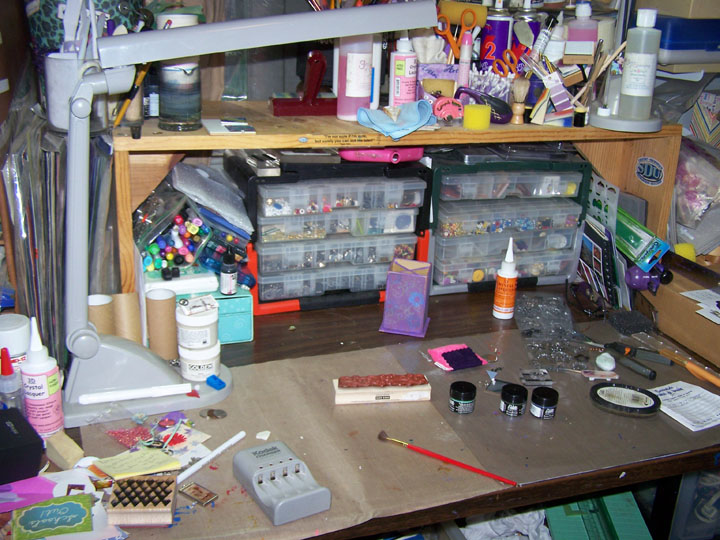
My Studio
Here is my studio - one of my favorite places to be - beside Disneyland. LOL. My home in the mountains in very small and i changed the second bedroom into my studio. As most of your know it's just me and my husband and lots of cats...
My studio is small - but i can just sit in the middle of the room and swivel around to anything in the room... LOL

This photo is just over my desk top. i have lots of storage everywhere. I have too much stuff.. well not really. LOL
 Here is my desk top. There is lots of room here in this photo. I normally only have about a 3" x 3" section to play. I do believe a clean desk is a sign of a sick mind. My mind is NOT sick. LOL

This is my paper stash.... Love my paper...

this is the wall i keep some of my projects...
well I hope you enjoyed the little tour of my studio. Love to hear about yours....
TTFN
Terri Sproul
My studio is small - but i can just sit in the middle of the room and swivel around to anything in the room... LOL

This photo is just over my desk top. i have lots of storage everywhere. I have too much stuff.. well not really. LOL
 Here is my desk top. There is lots of room here in this photo. I normally only have about a 3" x 3" section to play. I do believe a clean desk is a sign of a sick mind. My mind is NOT sick. LOL
This is my paper stash.... Love my paper...

this is the wall i keep some of my projects...
well I hope you enjoyed the little tour of my studio. Love to hear about yours....
TTFN
Terri Sproul
Friday, December 10, 2010
Tuesday, December 7, 2010
"Wishes for your birthday"
Here is a fun little booklet I made. This would be a great gift for a young girl for her Birthday!

 2) My paper is only pattern on one side – so I spray the white side of my pattern paper with Memories Mists, Cherry Smoothie. You do not see the Memories Mists in these photos.


remember if you ever have a question - just let me know.. I will do my best to answer
I wrote this blog post while participating on the Glue Dots design Team....
Wishes for your birthday
By Terri Sproul
Supply List:

Ink: Memories Chalk “Gingerbread”,
Memories Mist: “cherry Smoothie”
Paper: K&Company: Studio K 9 Stitched – all the paper is from this grouping
Glue Dots®: Lines, Craft, Poster, Micro,
Vellum Quotes
Eyelets or brads – if you use eyelet you will need an eyelet setter
Lots of Ribbons
Buttons
Bottle Cap with gear ephemera and Crystal Lacquer
Sticker Letter, words, embellishments
Rub-on words
Stapler: I used Tim Holtz Mini stapler (but you can use any stapler you have in the house)
Balloon Punch
Small tag punch – but you can hand cut tags
1) Fold 12” x 12” paper in half, fold in half the other way. Fold one side into 4th. Accord fold. You end up with a booklet that 6” x 12” with four pockets. You can make this project with different size papers. I have done with 8 ½” x 11” paper many times.

 2) My paper is only pattern on one side – so I spray the white side of my pattern paper with Memories Mists, Cherry Smoothie. You do not see the Memories Mists in these photos.
3) Rip first section – from top left side to bottom right side. 2nd Section: Punch with Circle punch – only punch ½ of the circle at the top to make a whole for you tag to be easy removed. 3rd Section: Do the same as the circle but with a square punch (or another space you can think of). 4th Section: Cut about 1 ½” down the inter seam and fold down twice. Adhere your folds with Glue Dots®.

Rip the first section - from the top right corner to the bottom left hand side.

2nd and 3rd section: Punch a Circle and Square on the top. See how the punch is in upside down and only 1/2 way.

4) Ink all edges with Memories Chalk Ink “Gingerbread”.
5) The embossed Square pattern paper – first I sand the whole paper to give bring out the embossed images more, then I ink the edges some…
6) Make 4 Tags – Just a hair under 3” x 6” tags. Or the size you need to fix into your pockets…


7) At this point I just started to have fun. I cut up the embossed Square Pattern paper to add to the inside of my project. Added lots of Rub-on words, sticker and vellum – adhere with my Glue Dots®


remember if you ever have a question - just let me know.. I will do my best to answer
I wrote this blog post while participating on the Glue Dots design Team....
Monday, December 6, 2010
Holiday Give-a-Way
Want to let you guys know about a give-a-way from ClearSnap.

Have a great Holiday
TTFN
Terri Sproul
Have a great Holiday
TTFN
Terri Sproul
Sunday, December 5, 2010
New Blog
I have started a new blog for Sakura Hobby and Crafts the home of 3-D Crystal Lacquer. Love this stuff. we will have some exciting news come soon. So please become a follower so you don't miss out on this news...
here is the link to the blog... Crystal Lacquer I hope you bookmark this site and become a follower
Do you have Crystal Lacquer in your studio. Here is where you can purchase. Click Here
Please tell and friends about this new blog and leave me a comment that you are now a follower and who you referred and you will have a chance to win some Blog Candy... Free Stuff! love Free Stuff...
You need to be a follower and referrer a friend as a follower to be entered... Wait to you see what I will send you! this is almost as exciting as the news I have coming soon...
Well can't wait to send out some free stuff and read all the comments on how much you love this stuff...
TTFN
Terri Sproul
Friday, November 26, 2010
Guest Designer for Scrolls Work Stamps

Great Stamps makes great cards... As you know I am the Guest designer for Scrolls Works stamps for the month of November. I got to play with Christmas Stamps. These are unmounted rubberstamps with amazing detail. I really enjoy my month as being a Guest Designer - I am hoping to be honored again, So I can play some more... Also check out Scrolls Work blog for more amazing projects from other designers...
Supplies:
Stamps: "jolly Holly" #8048, Angle Quote, Gingerbread man, and Jingle Bells
Ink: India Ink, Memories Dye Ink "Grass", and Palette Hybrid Ink "cognac"
colored Pencils from :"Fiber-Castell
Crystal Lacquer - Red Pen style applicator
Glue dots: Mini and Pop Ups
Directions:
1) Stamp "jolly Holly" in Grass ink onto white cardstock. Fill in letter "joy" with Red Crystal Lacquer pen. Set aside to dry - cut out image when dry.
2) Stamp: Gingerbread man with Cognac Ink onto White Card stock - color in image with colored Pencils - cut out when done
3) Stamp Christmas Bells with India Ink and color in image with colored pencils. I also colored in berry on the Holly with Red Crystal Lacquer. Set aside to dry and cut out image with done
4) Stamp "Angle" Quote onto white card stock and cut out.
5) Get your glue dots ready - let start to put together.
6) Adhere "jolly Holly" to card base using my Mini Glue Dots
7) Added Pop Up Glue dots to both the ginger bread man and the Christmas bells. Layer them as seen.
8) Add Quote with more Glue Dots and you are done...
Time to start doing lots of Christmas cards - Go to Scroll works and purchase these.
TTFN
Terri Sproul
Wednesday, November 24, 2010
Stylish Blogger Award
I have been given this Award by Brenda at "Creativity is only a state of Mind" I am so honored - what a great way to start my day. and did I say it's the day before Thanksgiving. I have something to be extra thankful for this year!

2). Share 8 things about myself
3). Pay it forward to 8 bloggers that I have recently discovered
4). Contact those bloggers and tell them about their awards
Thing to know about me:
1) I live on top of the middle of nowhere! I live on top of Palomar Mountain, just outside of San Diego. Love where I live! God's country
2) I have 5 cats and one husband. could be worst - I could have 5 husbands and 1 cat! LOL cat's names: Stickers, Pipper, Cedar, Peanut, and Spookers
3) LOve mixed media! Love to get my hand into product I have never used. They need to start making more of these. LOL
4) i'm a Disney Freak!
5) Johnny Depp - do I need to say more!!!!!
6) I send smiles out of facebook daily - are you my friend?
7) i will always have time for YOU!
8) I have fibromyalgia - this makes my days hard - but I keep on smiling!
Katie at Poeticgarden.com
Romancing the Artist Within
Lea Cioci
Cheryl Lindsay at Cherlinink.blogspot.com
Debbie Feist at DebbieFeist.com
Anna-Therses Cermola Luper
Chris Hurley at StinkyDogDesigns
Sarah Anderson at The Art of Moodling

To accept this award I have to do the following:
1). Thank and link back to the person who awarded me
3). Pay it forward to 8 bloggers that I have recently discovered
4). Contact those bloggers and tell them about their awards
Thing to know about me:
1) I live on top of the middle of nowhere! I live on top of Palomar Mountain, just outside of San Diego. Love where I live! God's country
2) I have 5 cats and one husband. could be worst - I could have 5 husbands and 1 cat! LOL cat's names: Stickers, Pipper, Cedar, Peanut, and Spookers
3) LOve mixed media! Love to get my hand into product I have never used. They need to start making more of these. LOL
4) i'm a Disney Freak!
5) Johnny Depp - do I need to say more!!!!!
6) I send smiles out of facebook daily - are you my friend?
7) i will always have time for YOU!
8) I have fibromyalgia - this makes my days hard - but I keep on smiling!
Here are the blog I have picked
Katie at Poeticgarden.com
Romancing the Artist Within
Lea Cioci
Cheryl Lindsay at Cherlinink.blogspot.com
Debbie Feist at DebbieFeist.com
Anna-Therses Cermola Luper
Chris Hurley at StinkyDogDesigns
Sarah Anderson at The Art of Moodling
I hope you all stop by these blog and see why I pick each of them. remember to leave some love - I personal live for you to leave me some love!
TTFN
Terri Sproul
TTFN
Terri Sproul
Friday, November 19, 2010
Mixed Media - Time is NOW

I wish I knew how to make my blog play music. Because this project was inspired by a Jimmy Buffett song.
I just love to make Mixed media project. they are so much fun to me..
this project is a 8 x 10 canvas with a ATC size EcoArt Board from Rubberstamp concepts.
EcoArt Boards are two sided Art Boards that you can stamp, ink, paint or collage on, they are endless. Give them a try, you will love them..
I painted the canvas with three color and blended them together. Add a little dress Pattern over the painted background (make great texture)
Lots of stamps images...
Ribbon and new embellishment from Tim Holtz.
As always if you have a question, please feel free to contact me anytime...
TTFN
Terri Sproul
Sunday, November 14, 2010
FaveCraft Blog Hop

I love a blog Hop, and I am so happy you have all join me here on my blog. I am a designer, teacher and product developer for a few different companies in the paper craft world. I love to play with different medium. I hope you become a follower of my as I love to teach lots of techniques use photos and videos. I also have my own page over on Favecraft, so check me out while you are spend time there. This post has lots of fun products and techniques in it. So let me show you what I made.

Supply List- most have link to purchase ;-)
Jewerely Box UsArtQuest
PPA Gloss
Accent Powders
Palette Stamp and GluePad
Heat Gun
Stamps: flower stamp (unknown) and Handwriting stamp: Stampotique, butterfly stamp: Magenta
Flower Punch: Daisey Punch, small and large size - or any flower punch you have
Silks
Dew Drops: robin's Nest
Black Gesso - Golden's
Paper Clay
Face Mold
Blue Acrylic Paint
Texture Sponge
Palette Noir Black Ink
Dutch Iris Twinkling H20
Black Leaf
Glue Dots
1) Paint box with Black Gesso or Black Acyclic paint you might need two coats with the Acyclic paint. Gesso saves you time. Set Aside to dry

2) Punch 6 large daisy flower and two small daisy flowers. Paint the flower with Silks, I used the Sky Blue and Fascia. See Sample

3) Place small amount of paper clay into face mold and unmold and let dry. TIP: you can put paper clay piece into 200° oven for about 10 minute and it will be dry. When your face is dry I painted mine with blue acyclic paint - same color blue I painted the inside of my box
4) Stamp butterfly image onto white cardstock with Palette Noir Black Ink. I used a purple water pencil around the edge of the butterfly and Dutch Iris Twinkling H20 in the middle of the butterfly and blended the two color together. Cut Image out. using my finger I added a small amount of PPA Gloss on the image, give it some shine...
5) Hand cut a leaf from white cardstock and painted with Leaf Green Silk
6) Back to our box: On the top of the box I used my textured sponge and Palette Stamp and Gluepad: Ink up the texture sponge and tap onto the top of the box and in a few spots, heat to activate ink and add accent powders to the area you applied the ink. Continue to do this technique over the rest of the box with different color of accent powders until you are happy with the top. I used three colors. love the look of this.
7) After I got all the accent powder on my top I need to add more. So I stamped the scrip stamp using the Palette stamp and glue pad, heat to activate the ink and applied "Black leaf". OMG - loved it... very happy with it at this point.
8) Stamp a flower stamp on the side of the box using the Palette Stamp and GluePad and more accent powders around the side of the box.

9) Painted the inside with blue acrylic paint.

10) Added my flowers, paper clay face, and butterfly to the top left corner of the box.
11) added Drew Drop to the centers of the flowers I stamp on the side and also to the center of the flower on top. See sample again
I hope you enjoy this project and you continue to stop by. I will be doing some blog candy later on this week. Need to leave me a comment today, become a follower and stop back by later on this week to be entered. Now hop on back to Favecraft to see the next stop...
TTFN
Terri Sproul
Friday, November 12, 2010
Shake, Shake, Shake

it's been a while since I made a Shaker card, but when i got these kissing snowman stamp from Scrolls Work, I just knew it had to be a shaker cards. so off to my studio I go...
I just stamped the Snow People image with Black ink and colored in the water color pencils...
the boarder around the image is Fiskard Boarder Punch - Snowflakes
brad in each corner. I am a little upset you can't really see the snow I put into the shaker part. hard to see that in a scan. LOL
Stop by Scrolls Works stamp and check them out. There prices are amazing and they have wonderful images!!!! remember if you have questions. please ask... I will help~ Really!
Wrote this post while be a part of the Scroll Works Guest Design Team!!!!
TTFN
Terri Sproul
Wednesday, November 10, 2010
Butterfly Frame
This year Christmas is going to be tight, my husband is being laid off on Dec 1st until March 1st. it's going to be a long 3 months. So I am coming up with idea for Christmas Gifts this year on a budget. I pick this frame up at the 99 cent store. It's so NOT my style. So off to my studio and see what I can do with it...

There was some green ribbon around the edges that I took off before this photo was taken. Sorry but had to go.... NOW. LOL
 First thing I did was paint the whole frame with Black Gesso from Golden. Gesso is a primer! it's covers almost everything... Set aside to dry

Off to find a perfect stamp or two. I have these two fern stamps from PSX - yes they are older stamps but they are perfect for this frame. You can use lots of stamps for this technique. Ink up my stamp with Palette Stamp and GluePad.

To activate this Glue you need to heat with your heat gun for about 30 second.
 Using a small soft paint brush add a very small amount of Accent Powders - you can mix your accent powder if you please. use a cotton ball to remove the extra powder
I stamped a few butterfly onto white card stock and colored in the image. I used watercolor pencils and twinkling H20'S
 I personal don't like to cut out the annetas out on a butterfly - so i cut them off. and use wire to add them back on.. I cut a small piece of wire and fold in half and curl the ends
 sorry this photo is blurry.... but you see what you wire should look like at the end... I attach this wire to the back of my butterfly with my Glue Dots...
I did make 3 butterfly and adhere them to my frame again with my Glue Dots. Can't live without them...
 I love the look of the Accent Powder against the Black backgound.. This is more amazing in person. Wish you all could see it... Well maybe you are getting it for Christmas, you will just have to wait and see if Santa bring it for you. Have you been a good girl/boy this year????
I wrote this post while be apart of Glue Dots Design Team. Hope you enjoy this product and you get your Glue Dots out...
TTFN
Terri Sproul

There was some green ribbon around the edges that I took off before this photo was taken. Sorry but had to go.... NOW. LOL
 First thing I did was paint the whole frame with Black Gesso from Golden. Gesso is a primer! it's covers almost everything... Set aside to dry
Off to find a perfect stamp or two. I have these two fern stamps from PSX - yes they are older stamps but they are perfect for this frame. You can use lots of stamps for this technique. Ink up my stamp with Palette Stamp and GluePad.

To activate this Glue you need to heat with your heat gun for about 30 second.
 Using a small soft paint brush add a very small amount of Accent Powders - you can mix your accent powder if you please. use a cotton ball to remove the extra powder
I stamped a few butterfly onto white card stock and colored in the image. I used watercolor pencils and twinkling H20'S
 I personal don't like to cut out the annetas out on a butterfly - so i cut them off. and use wire to add them back on.. I cut a small piece of wire and fold in half and curl the ends
 sorry this photo is blurry.... but you see what you wire should look like at the end... I attach this wire to the back of my butterfly with my Glue Dots...
I did make 3 butterfly and adhere them to my frame again with my Glue Dots. Can't live without them...
 I love the look of the Accent Powder against the Black backgound.. This is more amazing in person. Wish you all could see it... Well maybe you are getting it for Christmas, you will just have to wait and see if Santa bring it for you. Have you been a good girl/boy this year????
I wrote this post while be apart of Glue Dots Design Team. Hope you enjoy this product and you get your Glue Dots out...
TTFN
Terri Sproul
Sunday, November 7, 2010
12 Days of Christmas Clock

12 days of Christmas clock I made.
In the Holiday Issue of RubberstampMadness I featured with a project called 12 Days of Christmas Garland project. To Match that project I came up with this one! I really like it. and It is a working clock..
Supply List
Charger from EcoArt
12 - 2" x 2" Ecoart Boards from Rubberstamp concepts
12 days of Christmas Rubberstamps from Stampinton and company - make sure you get the rubberstamp ones - because the clears ones are smaller then the rubbetstamp ones.
colored pencils - Fiber-Castell's - my personal favorite
India Ink -Stewart Superior
1/2 Foil tape - any color you want..
I use Wrapping pager for the center of the charger
clock parts. I purchase mine at Micheal's
Green Acyclic Paint
Clean embossing Powder and Clean embossing Ink
Mod Pod
small hand drill for hole for clock...
Glue Dots
Direction:
1) Put one coat of Acyclic Paint on the whole Charge - I did two coats total...
2) Stamp each of your 2 x 2 ecoArt Board with the 12 days of Christmas using India Ink. color in each of the image with your colored pencils.
3) After your coloring is done - coat each days with clear embossing ink and embossing powder and heat set.. ( you can ink around the edges- DO this before you emboss)
4) wrap each of the tile with foil tape...
5) Cut out of wrapping paper your center - i used a plate that was the same size as my center of this charge to trace around to make my center.
6) Adhere center with Mod Pod...
7) find center of clock and drill a small hole.
8) Add clock!
Hang and enjoy!!!
TTFN
Terri Sproul
Thursday, November 4, 2010
Embossing with two color - one image

I am proud to announce that I have the honor of being Scroll Work Stamps Guest Designer for the month of November. I receive about 15 or so stamps from them. There stamps are amazing and they are unmounted, how cool is that. This save space and make them a wonderful price so I can purchase more. I just did a post last week on how to use your unmounted stamps. It's the Glue Dots Tip #2 - please check it out and I hope it helps...

Supply List - word that are highlight are link to the products website.
Stamps: Scroll Works - I used: "NOEL" #8005 , Pinecone Corner #8055, "Solid Holly" #8059,
Embossing Ink:
Palette WaterMark Inkpad
Embossing Powder: Green and Cooper
Heat gun
Red and Green Cardstock
Gold Cardstock
Corner Punch
Gold Leaf
Palette Stamp and stick Gluepad
White Glossy Cardstock
Pop UP Glue Dots
 Step 1
Ink image with Embossing ink and ink onto white cardstock. HINT: if you stamp this image onto another piece of scrap paper with black ink, you will be able to use that image as a reference for the next step.
 Step 2
Sprinkle small amounts of the two color of embossing powder you will need to cover your image. Use very small amounts (because you will not be able to safe the extra on this one - SORRY).

Step 3
Tap off extra embossing powder and heat set. It's that just too cool...
 Step 4
Ink Image with Palette Stamp and Stick Gluepad
 Step 5
heat Stamp and Glue ink with you heat gun for about 30 seconds, this make your ink sticky for the next step

Step 6
Add Gold Leaf onto image. Remove extra gold left HINT: all of you extra leaf can be saved, I personal put in all into a tubberware bowl with all other color of leaf and this make a great mix of my leafs..
 I like to use this very sad looking brush to remove my extra gold leaf. I only use this brush to do this technique.
 Step 7
I used my Palette Embossing and Watermark Inkpad and Scrolls Work "Solid Holly" stamp to add a watermark image to the red cardstock which is the base of my card.
Step 8
I matted my main image with gold cardstock after I punch each of the corner with a corner punch. I matted the "Noel" image with Green Cardstock and used a POP UP Glue Dot. Just adhere all your piece together. This word be a really easy card to make for your Christmas Cards this year, so head over to Scrolls Work and purchase some of their stamps. You will be amazed at the prices. all Three stamps for this card are under $10. WOW!!!
If you have any question please let me know. Be glad to help you out. Stop back soon, I plan on flocking soon! Exciting....
TTFN
Terri Sproul
Subscribe to:
Posts (Atom)