Pages

Monday, August 30, 2010

UsArtQuest DT - Mica Color

Time to Check out what the Design Team for UsArtQuest has been up to this time. I hope you have been hopping from one DT member blog to the next. If so. I'm the end of the line. Need you need to hop on over to the UsArtQuest Website and purchase these amazing palette of color. We receive a palette of Mica Color this time around. I got Interference. These are amazing color to use, Try using them on dark Card stock. WOW..... I have three simple and amazing techniques for you all using Mica Color. I made three cards, BUT all these techniques can be used to make scrapbook pages, Altered book pages, and much much more... Hope you share what you do with these color. Post your project on Facebook. Yes, UsArtQuest has a Facebook wall.... Are you a fan?


This Card I used the "StarGazer" Palette of Mica color which I already owned...
First I pick three color off the palette (Hint: used the colors next to each other they are meant to go together). I painted the three colors directly onto my stamp, then I sprayed water (not alot of water, maybe one or two sprays) onto the stamp, then stamp image onto black card stock - heat set image imitatively. by heat setting it imitatively you will stop the colors from running too much. As you see you do not get a crisp image with this technique - BUT i love it.... Too match the colors in my stamp image I used the same color to paint on to card stock to matte my image.
HINT: if you get too much water on your stamps. Heat set image as soon as you remove your stamp... (stamp - heat)


This Card I started off with a Dark Gray card stock and add two color from the Mica Color Interference Palette. I painted Interference Blue and Interference Green directly onto the card stock. Then I stamped Clocks using my Embossing Ink and Gold Embossing Powder over the back ground. Add Matted Quote.


This Card I Stamp the Lovebird image using Embossing Ink and Black Embossing Powder, heat set your embossing powder. Then just color in the image using your Mica Color. I used a dark gray card stock here, but Black Card Stock work well also.

Well like I said before this is the end of the line for the blog hop. Would love it if you leave me a comment they mean so much to me. REALLY! If you have any questions - leave me a comment and I will do my best to answer it...

TTFN

Terri Sproul

Saturday, August 28, 2010

UsArtQuest - transfere


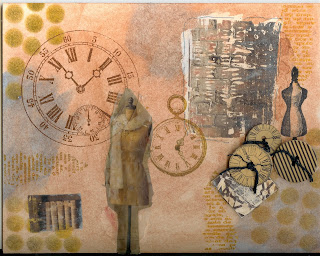
this is a idea I was trying. Not everything work out great on this project. But I enjoy trying to do new things. I have been working the UsARtQuest Design team for the last few months and I pick up a book on transfers the other day and had to run home and play.
Here is how I tried to make transfers with PPA (Perfect Paper Adhesive by UsArtQuest)

1) I found this amazing magazine what had lots of great photo in it. The pages are all glossy. Cut out some images. I found a brick wall, book shelf and a dress stand (i don't know what they call those things)
2) Cut out the images and started to play. First I used the brick wall (on my photo it the one on the top right side) This image did not take very well, I have to say I learn a lot on this first transfer. I put on PPA Matte on the the side of the image I want to transfer. Layed the image on the EcoArt Board. Let it dry. Once it was dry I add just a touch of water to the back of the image and peeled off the paper. WHAT I learn from this image: First put the PPA onto the board NOT The image, I believe that's why the image look wrinkly.
3) So had to try this again. Next I found an image of books on a shelf. Bottom Left hand side of the project. This time I tried something new. I place PPA gloss down onto the EcoArt Board and then place my image into the PPA. smooth the image out and let it dry. Once image was dry i sprayed some water onto the back of the image and remove the extra paper. I like this a lot! it work out well.
4) While waiting for my image to dry I had to try something else. So Here I go again. I place a Large amount of PPA Gloss onto a Teflon craft sheet and spread it out large enough to fix the image I cut out from the Magazine. I used a thick coat of the PPA Gloss. place my image into it face down and let it dry. This did take over nights. In the morning I was so excited to see if this work out or not. before removing it from the Teflon sheet, I add a little water to the back of the image and started to remove the extra paper. Wow... it worked.

Love this idea. hope you did too. Now go off to your studio and play. Let me know how you did. I would love to see what you make using this technique.
Remember to leave me some love and if you have any question. You know what to do....

TTFN

Terri Sproul

Friday, August 27, 2010

Tag book

I am now on the Design Team for Gee Gee Stamp and Stuff store in Carlsbad, Ca. My first assignment was to work with some Cosmo Cricket Paper Line. They have a box in the store for the designer to use, basically open product box. There were these large tags in there. I knew right then I was making a tag book. You can get all the supplies for this project at Gee Gee Stamp and Stuff in Carlsbad, Ca.
Supply List
Cosmo Cricket Paper:
Elements
Umbrellas
Boarders
Sticker Sheet
Carbonation
Tags
Ribbons
Silk Flowers
Brads
Memories Mists


This is my cover. Simply sprayed tag with Memories Mists "wheatgrass" then rip a piece of the pattern paper and adhered off centered. Add sticker and slide mounts with photo inside of them.


Spray tag with Memories Mist "Blue Martini". Clouds are from Borders page and the quote. Added ribbon to quote with Tim Holtz Tiny Staplers.


Sprayed Tag with Memories Mists "orange Juice" added some pattern paper to edge. The top edge I used a Border from the Border Page. the Slip Flops quote is from the sticker sheet and the Flip Flop image is from the Elements Page.


Sprayed Tag using Memories Mists: "blue martini". Added some Cosmo Cricket paper to side of tag. Added Sticker, ribbon, and silk flower to complete this page.


This page I sprayed the tag with Memories Mists: "Mango Lemonade". The Quote is from the boarder page of the Cosmo Cricket "Snokles Line" , cut into pieces and added ribbon with Tim Holtz Tiny Stapler. Added Silk flowers - I added color to my silk flower using my Memories Mists.


This page was super easy. First I spray tag with Memories Mists: "Wheatgrass". All of the art on this page was from the Elements page of the Cosmo Cricket "Snorkel" line. I added ribbon to one of the bathing beauties.


sprayed tag with Memories Mists: "Blue Martini". Added "Swimming" Border to bottom of tag. Add Sticker "Let the good times roll". Blue cardstock for Photo Matte. Punched two corner from Cosmo Cricket Paper.


sprayed tag with Memories Mists: Orange Juice. Punched out two different size circles from Cosmo Cricket "Snorkel" Umbella and and adhered to background. Added arrow Sticker.


This page is a pocket page. I used part from the Elements page to make two pockets. I made tags also using some of the stickers and parts off the Elements page. Cut 1" x 2" strips of blue cardstock fold in half and add sticker letter. Stapled each of the letter stickers on the edge of the book spelling out the word. Added "o" ring to hold book together.

I hope you enjoy my tag book. Super easy to make. If you have a question please feel free to leave a comment here and I will get back with you asap...

TTFN

Terri Sproul

Friday, August 20, 2010

My Art Mini Book

Here is a Mini book I made use all UsArtQuest Products I have revived since I have been on the UsArtQuest Design team...

I started by cutting two 6" x 13" sheets of Studio Cloth. I add Perfect Pigment "Yellow Ochre" to the mixing cup supplied in the Perfect Paint Bucket to mix paint with water before paint it on the Studio Cloth. I added stamps and more water down Perfect Pigment paints. I painted the Flower girls with Mica colors.

I used one of the European Napkins we receive in a kits to made this page. I added Effectz and PPA to cover the whole image. The Photo is not showing the Effectz well, but it really does shimmer... :-)
On this page, I cut a pocket shape out of the Studio cloth and stamped and painted on the pocket. I die cutted the edge of the Studio Cloth. I used Mica Flakes on the Studio cloth Die Cut leaves and glossy PPA. I painted the silk flowers with Mica color Interference.


Stamp using a Art Quote from UsArtQuest collect from Sandi Miller. I added Mica Color interference paint on the heart and add Mica Flakes. wrapped with wire. I used my Fine Liner and Duo Adhersive to add Gildenglitz to the edge which I again used a Die Cut. Hint: you will need to paint over the edge using PPA as a sealer before trying to add the Duo Adhesive and Gildenglitz....


Stamp and Embossed Moca Lisa on Mica Tile. Love this look.


I used PPA Matte to seal Studio Cloth so I could add Duo Adhesive and Gildenglitz to the studio cloth. Painted my silk flower with Perfect Pigment and Mica Color..... The Face is paper clay mold and Gildenglitz....


Collages my background using PPA Matte as my adhesive; add stamps, papers, tag and paint to age the page..


I sew the book together by laying on sheet on top of the other and added four small holes to the center of the pages and sew together with floss. I signed the back of my book and it's complete. I hope you enjoy this mini book.

If you have any question please feel free to ask. I will get back to as soon as I can!

TTFN
Terri Sproul =^)

Tuesday, August 17, 2010

You are Invited to play with me!

US Art Quest is hosting a blog hop and you’re invited to participate!

All Artists In blog hop

The USAQ “All Artists Welcome” Blog Hop August 30th 2010

The USAQ “All Artists Welcome” blog hop is open to anyone who would like to participate by making an art project that prominently features a USArtQuest art material. All entrants must give USArtQuest, Inc. the rights to use their projects in magazines, blogs, their website or any other print material when appropriate.

All entries must be received by: August 20th (please specify your main product when entering to help sort the blog hop order) Please send all entries to: canyoupixelthis@gmail.com

Rules for participating:

  • Artists may incorporate any technique or style, including home decor projects, personal accessories, scrapbooking, cardmaking, altered art, polymer clay, mixed media, rubberstamping and all paper art and craft kitchen sink techniques.
  • Participating designers and DT members will create easy to follow directions for the visitors to reference.
  • Artists may use ANY of the following USAQ ‘Logo’ products. Whichever material selected, it must be prominently featured and recognizable.
  • You must post to your blog by 12am eastern time on August 30th.
  • Link all USAQ products used in your project back to the USAQ store.

The winning entry will be decided by: September 4, 2010

  • The winners will be notified via email, and their winning entries reposted on the USAQ Blog.
  • Jessica, the USAQ Design Team Leader, will send the blog hop path to everyone no later than August 23rd.
  • The first blog will link to the 2nd blog, the 2nd blog will link to the 3rd, and so on. Every blog, from the 2nd to the last, will link to the USAQ blog as the start. (This is in case we have any blog readers who come in directly to our blog. They’ll be directed to the 1st (USAQ) and can follow the blog hop in the correct order beginning from USAQ.)

After the hop, the USAQ Staff and our Design Team Leader will narrow down the entries to the top ten artist entries. Those ten artists will be voted on by an online popular vote poll, with the top three winning:

Grand Prize – A $100 gift certificate (online or showroom only)

In addition, the Grand Prize winner will win a guest spot on the USAQ design team for one month!

Second Prize – $75 online or showroom gift certificate

Third Prize – $50 online or showroom gift certificate

These include:

Duo Adhesive including Gildenglitz

101 – Artist Cements – Light, Heavy or Craze & Crackle

Dicrofibers

Perfect Pigment – Acrylic Fluid Paints

Perfect Pigment – Acrylic Glaze

MicaColor Watercolor Palettes

Mica Tiles, Shapes, Flakes & D’Lights

MicaCraft

Studio Cloth

Fine Liner

Sandi Miller Art Stamps (These are exclusive to USAQ)

Printmakers

USAQ Stencils

USAQ Satin Mache

Less obvious products with a USAQ Logo are welcome in your designs and instructions.

Perfect Paper Adhesive – Matte or Gloss

Great Tape

European Napkin Collection

Art Canvas (ATCs)

Foil It

Dazzle It

Willeez

Studio Paper

Perfect Lamin It

Tinz (Heart, Star, Dragonfly or Ivy)

Wireworks

Styl’ines (must be our designs)

Doublesticks

Or any other products from USAQ

If you have any questions, please do not hesitate to ask!

Sunday, August 15, 2010

UsArtQuest DT - Perfect Pigment and Studio Cloth

Another amazing Kit we got in the mail a couple weeks ago. First we receive "The Perfect Paint Bucket" which included 6 Acrylic Paints 6 Mixing Cups 1 Paint Brush and 4 sponges... I Love to work with paint - Next I pull out of the box a couple of "Perfect Brushes" - these are amazing quality. I am a little scared to uses, I am very hard on my paints brushes. I Promised to clean right after each use.... I promise.....
Back to my box.... Next I pull out Studio Cloth - "WOW" I have been wanting to play with this stuff.... Now wasn't that an amazing box... Go and order your box right now!!!!
Time to Play....... Here is my project I made with the box of goodies I received...


It's a Bookmark......


Supplies:

Studio Cloth
Perfect Pigment - secondary Bucket...

Glazing Medium
PPA
The Perfect Brush - different sizes..

Stamps: Stampotique and Unity....
Chip Board
Small Brads
Copper Wire - hardware store....
small copper key charm
Ink: Palette Ink Pads: "Noir Black" and "Viridian Leaf"


Directions:
1) cut Studio Cloth larger then your Chip Board piece. My Chip Board piece was 5" x 2 1/4". I cut my Studio Cloth bigger then my chip board - so, I can cut the extra off later...


2) Paint Studio Cloth with Perfect Pigment "Purple Mist" ( you all know I love purple). Set aside to dry....


Clean my brushes.....


3) Stamp Image onto to Studio cloth using Palette Hybrid Inkpad


4) Seal stamped image with Clear Gesso... set aside to dry... clean my brush...


5) Stamp Quote Image using Noir Black Hybrid Inkpad


6) The color was too strong for me so I had to grunge it up a little. so I mixed Perfect Pigment "Burnt umber" with a glazing Medium and a little water. Just a few drop of the Perfect Pigment is all you need the colors are amazing... Painted the whole bookmark with the Glaze Burnt umber paint. Much better..... Clean my paint brush....


7) cover my Chip board piece with PPA Matte and placed my Studio Cloth over the Chip board. Turn the Chip Board over and cut around it. using your chip board as you guide.... Clean my Paint Brush...


8) Added the brads to the corners of my bookmark. Need a little more so I added the copper wire (found at the hardware store) and a key charm....

Stop by each of my fellow designer and see what they have done. We also have a guest designer for this weeks post. Check Lori project out also...

Well that is about it... Super easy..... Hope you make one soon... I am working on a Mini Book with the Studio Cloth... it's amazing. I did not get it done yet. But here is a sneak peak at it. I am using everything I have received so far as a UsArtQuest Designer... Please stop back by and see how it turn out. This project is far from being done. But I have used almost everything we have recieved so far... Mica tiles, Mica Flakes, Perfect Pigment, Studio Cloth, Napkins, PPA Matte and gloss.... and much more....


Stop by and see what my other team mate have completed. Also check back soon lots of exciting thing going on....

TTFN

Terri Sproul

Thursday, August 5, 2010

UsArtQuest DT - Mica Flakes #2


Here is another project I made using the Mica Flakes... I just had fun! No rules......

Supplies:
Mica Flakes
PPA Gloss
Red Line Adhesive
Crystal Laquar
Flower Punch
Black Tag
Stamp: Arched Glass from Stampington
clear Embossing Ink
Black Embossing Powder
Chip Board flowers
Palette Paint: Stewart Superior.....
Memories Mists: Stewart Superior - Pink Lemonade
fiber

* Across the bottom on this tag I did something kinda cool. I used a heavy Tape (red line tape will work) Poured Mica Flakes in two colors on to the tape. Then I added Crystal Lacquer over the mica flake....

* Punch out a few flowers from paper and sprayed paper with Memories Mist. Added some PPA Gloss and Red Mica Flakes...

* I stamped the Arched Glass stamp with Clear Embossing Powder and embossed in Black. Then I added some Palette Paints in two colors to the tag. Rubbing off most of the paint...

Those are the highlights of this project. Any Questions please let me know...

Please Pick up the Fall Issue of Rubberstamp Madness Magazine. I did my first article in this issue. I am so happy...

TTFN

Terri Sproul

Sunday, August 1, 2010

UsArtQuest DT - Mica Flakes

It's time to see what the UsArtQuest Design Team has been up to this time. I can't wait for my mail person to deceive our next mystery package. This time around we received Mica Flakes Kit. This Kit is amazing..... Inside this reusable metal box (can't wait to make something out of this box) there were 16, yes 16 assorted Mica Flakes jars, and they are all different colors. Yes, who knew that Mica came in that many different colors. So Cool, Sorry I got off track, back to the kit! Also included in this wonderful box of goodies was PPA (Perfect Paper Adhesive) in Gloss, 2 little dippers, paint brush and full directions for projects. WOW, have you order your kits yet?????
Here is photo of my project.


Supplies:
6" x 6" Ceramics Tile with a 2 1/2" x 2 1/2" hole in the center of it. (HomeDepot)
European Napkins
PPA Glossy from Mica Flakes Kit
Mica Flakes


Directions:
1) clean tile with glass cleaner
2) Cut out main image from your Napkin of choose (UsArtQuest has so many different napkin to choose from) I cut out 5 main images on this napkin. These Napkins have 3 layer to them two of the layer are plain white (remove them, we will not be using them in this project*)
3) Place a light coat of PPA gloss onto the tile area you would like to place your Main images...
I used my finger to get the light coat I was looking for, Add a coat of PPA on top of the Napkin image also.
4) Continue to add all your main images around the tile....
5) After your main images are place, fill in MOST of the rest of the tile with left over Napkin material. I just cut up napkin into smaller pieces (only using the colored part of the image Top layer of the Napkin)
6) Leave a few area open around your tile....
7) Add Mica Flakes into those open areas..... Add PPA gloss to those area and use your fingers for a little dipper to sprinkle on the Mica Flakes into the PPA gloss.
8) Fill in all the area that are not cover with the Napkin.
9) Set aside to dry and then tap off the extra Mica Flakes (Save them)
10) Add your photo or quote to the center of your project!
DONE!

* You can use those White piece of the napkin in another project as a filler, try stamping on them. NO waist.

I have a few more idea on how to use these Mica Flakes so stop back by this week and see what else I made. Hope you are checking out the rest of the Design Team member's blogs and see there work. I know I will be, I get so excited to see what each of us came up with. There is a full list and links on the right side of my blog. leave me some love.... I really enjoy see what you guys say! it' really really makes my day! =-)

This is another project I did using the same Tile - all stamps are from Stampotique


TTFN
Terri Sproul