Pages

Thursday, October 14, 2010

FaveCraft Blog Hop

This is a mini book about one of my kitties... His name is Cedar. We will in the wood and our yard is full of Cedar Trees... this is how he got his name.
This book is made with used CD - you know all those CD you get in the mail all the time. Well I had to do something with them. So I made this book.
As I have told you all before. I LOVE A BLOG HOP!!!! they make me excited. I get to meet new friends and great new comments. I get to know other designer and become their followers.
Hope you leave me a comment and become my follower today...
This is the cover: Here I used Pattern paper to cover the CD and then paint some metal number with Acyclic paint. Those are clock hands (doesn't work as a clock- just an embellishment)

I used a Slide Mount and more painted metal letters. The brads have Crystal Lacquer on them to give them that gem look.

Do you just love the little cat collar. It's so cute. It's an embellishment from EK Success. Also check out the large (very Large) paper clip.

Found this cute little Cat Charm at a yard sell (sorry). But I did use a smaller paper clip and attach a charm to it.

On these two pages I made pockets. One of the pockets (black one) is made from a tag. I just folded the tag up and made it into a pocket. Added some tags in the pockets.


Well I hope you love my mini book made from CD. Please leave me come love, honestly I live for them... lol
Also enjoy your time at Favecraft and let your friends know about this site. It's for all the crafters in your life.

TTFN

Terri Sproul

Tuesday, October 12, 2010

Thinking out of the Box with Glue Dots

I love to think out of the Box and come up with new way to use a product. As a Dottess I was assigned to think out of the box with Glue Dots. So here I go.....


First Take two silk flower - I love to only purchase white silk flowers and I spray with My Memories Mists to add the color I wants.


After my Memories Mists is dry I glue them together with My Glue Dots


Now the fun part. I added a Pop Up Glue Dot to the center of my flowers I just Glue Dotted together.

Now add embossing Powder of your choice and color to the Pop Up Glue Dot. Remove the extra embossing Powder and Heat set with your heat gun
HINT: be careful Not to heat your silk flower too much. they melt.. So keep you gun far aways and just melt the powder.

Well that's today Glue Dot tip. I wrote this blog post while participating on the Glue Dots Design Team...
Leave me a comment and tell me your favorite tip to using Glue Dots.

TTFN

Terri Sproul

Sunday, October 10, 2010

Mixed Media - Phyco Clown


This is a mixed Media project I have been working on the last few days. It's start off by me looking at the plastic rings that soda come in. I cut them apart and it look like a face. So off to my studio I went.
supply list
cigar box top - left over from another project...
plastic soda rings
buttons
glue dots
gesso
acryclic paint - black and yellow
letter punches - yellow card stock
green pattern paper
sparkly fluff - very cherry red
red eye lash fiber
black pen

Direction:
1) removed all the paper from my Cigar Box top - as much as I could. Sand it a little.. Then paint all with Gesso. set aside to dry.
2) paint the plastic ring with Purple acyclic paint - lite coat or it will peel off.... let dry
3) punch out words "Phyco clown" from yellow card stock
4) adhere my plastic down to board with Glue dots.
5) Paint in eye area with yellow acrylic paint
6) painted background Black
7) where the clown mouth is - I coated the area with white glue and added the Sparkly Fluff.
8) cut out a shape of a clown hat from pattern paper and added a button to the top and black pen marks around the edge to add a little more and a little fiber to the bottom of the hat. .
9) Add eye (buttons) with Glue Dots "Pop Up"
10) adhere the words, hat and trim around the frame.

I have a Halloween Party every year at my home in the mountain in the woods... How cool is that. I love to play dress up.... so this project will hang in my bathroom this year...
Well I would like to get this project posted. So more project and stories soon...
TTFN

Terri Sproul
Friday, October 8, 2010

Free Make-N-Take


This is a simple card I will be done at a Free Make and Take at Gee Gee's Stamps and Stuff on Oct 23rd. I will also be selling Stewart Superior products featuring Memories Mists.
I wish you could see this in person, it's really cool. I made the card base from Transparencies and embossed the tree on the front of the transparency. On the inside of the card, I again used a transparency to punch out a moon shape, which will act as a mask when I spray the white card stock with Diet Cola Memories Mists. Stamped "Trick or Treat" on the bottom right hand side and adhere inside of transparency card base.

Sorry about such a quick blog today. But I am working on a few large projects to post soon.

TTFN

Terri Sproul

Wednesday, October 6, 2010

Queen Kat Blog Hop

I Love a blog Hop and adore Fall! Today is blog hop day with Queen Kat Design Stamps. I hope you all stop by her store and see all the exciting stamps she has to offer. Lots of excitement going on there...
Well, to be honest, my post went up here other day - don't know why - gremlins I guess. I let it stay up and decided to post another project today. We were ask to make a Fall Tag or Card, but I am a teacher at heart so I had to find a way to teach you a new technique. So hope that I did. If not, maybe next time.... Grin.... :-)
If all goes I as plan I will have a video for you on how to make this tag. I will post onto My Youtube Channel. Due to all the storms I am unable to post the video yet. plan on uploading it this weekend. I live on top of the middle of nowhere and I have dial up. we have been having days of rain, lighting, etc... So my video will take a few hours to post and i can't leave my computer on that long with the storms... So Sorry.....

Supply List

Stamp: Quote: Stampotique, Flower: Hero Arts
Memories Mists: Wheat Grass, Ice Coffee both from Stewart Superior.com
Leave Punch
Accent Powder: Cooper and Green by Stewart Superior.com
Memories Chalk Ink: Tomato
India Ink
Palette Stamp and Glue Pad by Stewart Superior.com
Heat Gun

This project has a few different techniques that are pretty cool. I used the same Accent Powder technique in the post that when up early, so check it out also, there are full direction on how to do these two projects, and leave me some love please. Here is a photo of the card and the tag I made.


Your next stop of the hop is to Lara Bandanas blog, Click Here

Thanks for spending some time with me in my studio, I hope you become a follower of mine here, facebook, The Hive, Youtube and my Website. (each word, should be a link for you) unless them gremlin got it.... little shits! sorry outside voice..... ;-)

TTFN

Terri Sproul

Monday, October 4, 2010

Glue Dots Design Team Project


Trick or Treat Cigar Box


Supplies:

Glue Dots® “Pop Up”

Glue Dots® “Craft”

Glue Dots® “Glue Lines”

Cigar Box

Gesso

Stamps: Stampotique Original: “Kitty”, “Welcome Door”, “Spider”, “Honeycombs”, “Crow on Line”

Stamps: Moon by Fancifulstamps

Stamps: Quote by PXS Stamps

Stamps: Stars from Martha Stewart

Colored Pencils: Faber-Castell

Ink Pads: India Ink by Stewart Superior, Memories Dye Ink “Yellow”, “Cement” and “Sepia” Memories Ink pad are also from Stewart Superior

Goldens Glaze: “Ultramarine Blue” and “Patina Green”

Acrylic Paints: Black

Silk: Sky Blue by Stewart Superior

Memories Mists: Iridescent by Stewart Superior

Textured Ribbon – brown mesh

White Cardstock


Directions:

1) Cut top of Cigar Box lid off… Keep for another project!

2) Paint the entire box with Gesso (this is a primer to cover all the cigar box labels). Paint outside of box with Black Acrylic Paint. Paint inside of box with two colors of Glaze “ Ultramarine Blue” and “Patina Green”

3) When paint is dry Stamp “Stars” with “Yellow” Dye Ink

4) On White Cardstock stamp the following in India Ink and color in with Faber-Castell Art Grip Pencils: “Spider”, “Kitty”, , and “Girl”. Also Stamp “Moon” onto White Cardstock and Paint with Stewart Superior “Sky Blue” Silk. Stamp the “Welcome Door” with “Sepia” Memories Dye Ink, before I color in the image I painted Gesso on the door where it’s says “Welcome” to completely cover this word… When you have colored in each image, cut them out.

5) Back to the box: Stamp using India ink “Crow on a line” (see sample for placement) also Stamp “honeycombs” onto the bottom where your door will be. I used the Honeycomb stamp to look like a walk ways…. Stamp in Memories Dye Inkpad “Cement”. Paint in honeycomb image with Acrylic Paint.

6) Using My Glue Dots® I start to put my box together. I used the “Pop-Up” under the Moon, and the Kitty. “Craft Dots” under the Door, Girl and the Spider. As for the Spider, I hung spider from the top of the box with “Craft Dots” My Girls is adhered to the side and bottom of the box. I used Fishing line to make the spider line invisible, I just Glue Dotted to the back of the spider and the top of the box.

Finished by stamping “Trick or Treat” inside the box where it fit the best and spray the entire box with: Iridescent Memories Mists. Around the outside of the box I wrapped a Mesh ribbon using My “Glue Lines”.

I wrote this blog post while participating on the Glue Dots Design Team!


TTFN

Terri Sproul

Creating The Hive

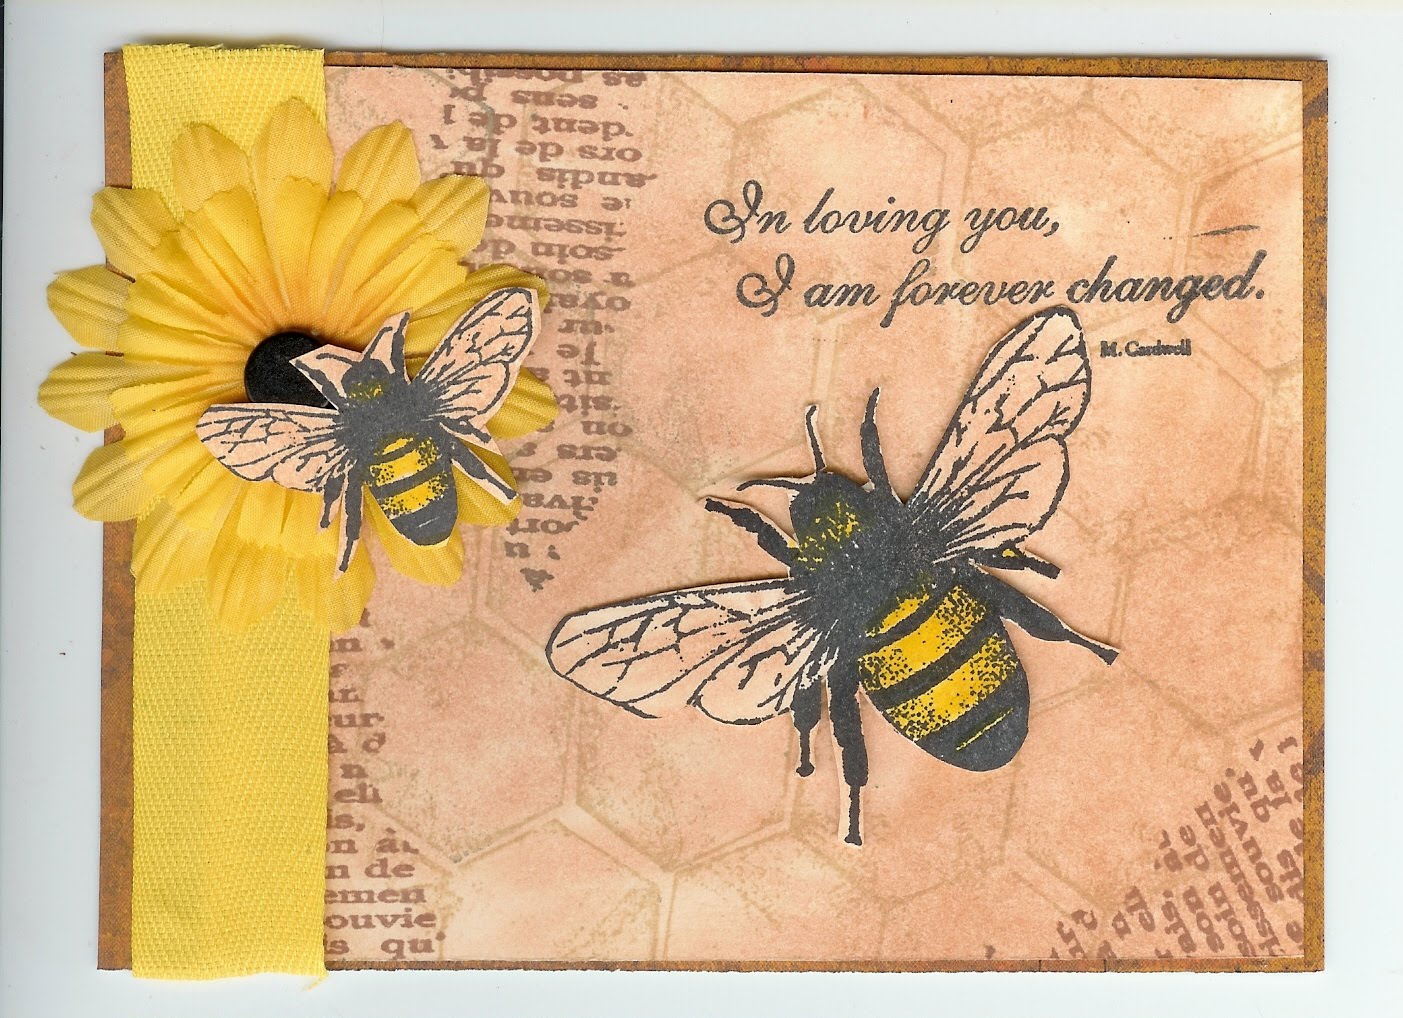
Today is Monday (my Friday!) and while watch Sunday Night Football last night was I invited to a new website, The Creative Hive. There is a link on the left hand side of my blog - can't miss it. So in honor of this new find I made this wonderful Card.


Supply List
All Stamp are from Stampotique Click Here
India Ink from Stewart Superior Click Here
Dye Inks from Stewart Superior

Directions:
Stamped Both bees onto White Cards with India Ink - color in image with colored Pencils, cut images out..
Stamp background with two different stamps, added quote.
Pop Dot both Bees - add flower and ribbon - Matte on top a dark brown card stock and add to card base....

I have lots happening this up coming week - so stop back by - we have the Glue Dots DT going on tomorrow. and a blog hop with Queen Kat Designs

Excited!
TTFN
Terri Sproul