Pages

Showing posts with label Oil Pastels. Show all posts

Wednesday, January 22, 2014

A card for all Occasions


Supplies:
Oil Pastel
Robin Nest Cardstock
Robin Nest Little Friends
Ribbon,
Nori Paste


I make cards, but I don't like to make theme cards, so I try and have a collection of Cards that are ready for me to use with an occasion


1.  color White Cardstock with Metallic Oil Pastel from Yastomo - use as many color as you choice here, I like to make my section small.  This way you will see more color then you scratch off.


2.  cover all color with BLACK oil pastel


3.  Cover with Stencil of choice (or you can hand draw).  I used this heart stencil from Creative Imaginations. take a wood stick with a point on it and start remove the black oil pastel use the stencil as your guide.
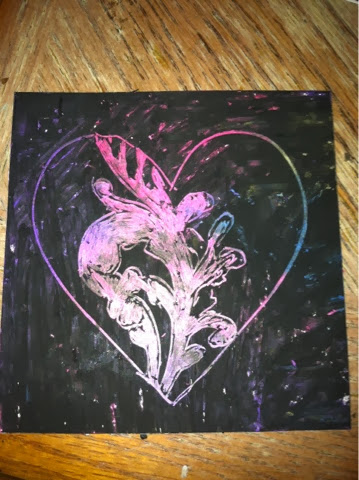


I did the same idea for the inside of my card, BUT i did not remove the black oil paste yet, I am waiting until I need this card, then I will add my quote.  


Hope you are inspired by my project this time around and you stop by the Yasutomo website and get yourself some Oil Pastels.  

Thanks again for stopping by

Terri Sproul 


Tuesday, January 7, 2014

Wing for YOU

Wings to Fly


Do you love it when you start off making one project and it end up making something completely different?
That's what happen here, I start off make a background to stamps some Fall Leaves on for a completely different project and make this.  

Supplies:
Stamps:  Quote Stamp and a Dragonfly
3 white sheet of Card stock
baby oil and a cotton ball
India Inks - Black 

1)  I used reds, oranges, and yellow Oil Pastel for my background paper.  After add these color to my white piece of card stock I blend them together with a cotton ball and baby oil.  Set this aside
2)  Using shade of Green, I did the same thing on a new white card stock, set that aside
3)  One more time, this time with mostly Yellow, but a touch of orange to a new sheet of white card stock. 4)  Now I had my parts, I start by ripping the Green sheet to make my rolling hills, I did go back over the areas where the rip edge was white again.  
5)  Rip  a SUN shape from the Yellow Sheet of paper
6)  Now to make my scene, I adhere my shapes down to the background using my Nori Paste
7)  Stamps both the Dragonfly and quote onto the page using Black India Ink, Color in the Dragonfly image with my Gel Xtreme Metallic Rollers.  Now it's really to frame.  

I hope you enjoy my little project, and hope you might try and play with Oil Pastels too.  
Terri Sproul 

Thursday, December 12, 2013

Art Journal - No Fussy Cutting your stamps


Dear Santa
Supplies:
Golden Gel Medium - Matte
Acrylic Paint
book Text
SinCity Stamps
Oil Pastels
Golden Titan Buff
Letter Stencils
Glittler glue
Faber-Castell - Big Pen
India Ink
StazOn

Here is the Tuesday NIGHT show:


Thanks again for stopping by

Terri Sproul

Tuesday, December 10, 2013

Christmas Flower

I just love Christmas time, these Poinsettia plants are so pretty.  

Supply List:
Canvas

1.  Started with a Canvas about 8 x 10
2.  Hand Drew my Poinsettia using Oil Pastels
3.  Fill in the Poinsettia with Red Watercolors, and the back ground with a Blue color


I am so excited to announce I get to give you a change to win some of these wonderful
OIL PASTELS
To be enter you must
1.  Like the Yasutomo Facebook Page - Tell them I sent YOU
2.  Leave me a comment
3.  I will announce the winner of the contest on my Tuesday Night show 

Thanks for stopping 
good luck!
Terri Sproul 


Wednesday, December 4, 2013

Be Happy Art Journal

As Most of you know I love to play in my Art Journal.  I have been producing a weekly live stream show on Tuesday Nights for over a year - we have been doing different Art Journal Techniques - all of these techniques can be used in our Scrapbook layouts, Cards, Canvas, etc...  
A few weeks ago I did a show all about layers and stencils - building on the techniques the week before.  When I teach techniques, I try to build on the technique I used the week before.  

BE Happy


Supplies:  
Stencils:  The Crafter's Workshop
Fiber-Castell: Big Pen 
Letter Stamps
Oil Pastels
Acrylic Paints,
Distress Inks
Dylusions


Here is a video show I did a few weeks ago - on how to do this technique.  Enjoy

Monday, December 2, 2013

A little birdie told me so

I have been playing with Stencils and Layers!  Oh, this is just too much fun

supply List
Stencils:  Most from The Crafter's Workshop 
Paint:
Distress Inks
Letter Stickers
Oil Pastel from Yastutomo 


Here is a video that will show you this technique:  


Thanks for stopping by, hope you join me LIVE on Tuesdays

Wednesday, November 27, 2013

Art Journal - layering with Stencils

I love STENCILS..  Oh, how I do...
and Art Journals allows me to play

Most of you Know I do a Live show on Tuesday Nights 
Tuesday the 26th I did a Show about Stencils
Coffee

It's Thanksgiving Time and I want to talk about something we are Thankful for
but not the normal stuff, like family, health, etc...  

I am THANKFUL for Coffee every day!  LOL

Supplies:
Dylussions - Ranger Ink
Distressed Ink - Ranger Ink 
Stencils from The Crafter's Workshop
Memories Spray by Stewart Superior
Stamps:  
Stazon
Paint:  


Here is last night show - Please give me a thumb up and subscribe to my Youtube.com/terrisproul channel 


Thanks again for stopping by.
Terri Sproul

Wednesday, November 6, 2013

The Moon

As most of your know, I live on Top of Palomar Mountain, in California.  Our Mountain is known for it's Observatory - one of the largest in the world.  I am telling you this because I was sitting on my porch the other night and the moon was so large and bright in the sky, it took my breath away.  Then a cloud passed in front of the moon, this site was amazing...
The next morning, I could not stop think about how pretty that moon was the night before, So I headed into my studio and started to play.

Supplies:
Canvas
Black Gesso
Oil Pastel
Pale Gold Sumi-e watercolor 
Waterbrush 

DIRECTIONS
1)  Started off with a Canvas, painted it was Black Gesso.
2)  The Oil Pastel are so easy to use, it's just like use a crayon,  I drew in my moon with a the White and Light Yellow Oil Pastel.  Bending them together with my finger
3)  With Blue, Grey and White, I started adding those clouds I seen the night before.  Blend the three colors with your finger to get the effect.
4)  Stars - I had to add stars - Since we have no outside lights up here, the star are very bright.  I got my  mini waterbrush (love these brushes) and started adding star with my Pale Gold Sumi-e watercolor.

Stop by the Yasutomo website and check out all the fun art supplies they have!

Terri Sproul


Wednesday, October 2, 2013

One Last Moment with Summer

Yes, I know it Fall now, but I had to get one more moment in with Summer.  I am a Mixed Media Artist and I just love to make Art Journals and Yasutomo allow me to play with lots of different mediums.


Art journal - today I am sharing my Art Journal page. Sometimes I go all out with lots of layers with paints, inks, stamps, but there are those moment when you just want to make life simple.


 I used the Niji 36 Oil Pastel and drew a tree, starting with a dark brown Oil Pastel and coloring in with a lighter brown color.  Used two shades of Green to make my tree top and grass, as you blend the two you will get more colors.   

 Here is the best part, as you might know Oil and Water don't mix, so with this in mind.   I got my Niji Pearlescent Watercolor set  and Watercolor Brushes  and start coloring in the sky.  Since water and oil don't mix, the water color did not mix into my tree or grass.  HOW cool is that.  love it..

 I stamped this Bird image and Girl in the Grass, colored them in using my Gel Xtreme Rolls.  Love the way this looks 

Just one more touch, I got my old Calligraphy Pen out and the Yasutomo Traditional Chinese Ink Ultra Black ink and wrote the quote "It's a summer thing" .  
Thanks for stop by the blog today, stop by again.  

Terri Sproul