Pages

Showing posts with label Halloween. Show all posts

Friday, October 24, 2014

Easy Halloween Banner

I am so honored to be apart of the Ebrush Design Team this Term.  Can't wait to show off some fun project over the next 6 months

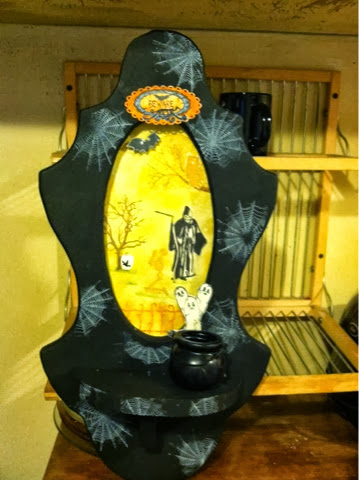
See how cool and easy this is


Supply List
Sharpie - Black, purple
Banner Die cut from Quickutz
White Letter - 
Die Cut:  Spider Web and Spider
Ribbon

Direction:
1)  Cut out Banner from Orange Cardstock - as many as you need - I need 3
2)  cut out Spider web and spider from Transparencies Or you can use card stock, I like the transparence because it's thinner and you get a better spray
3)  Lay the Spider Web on to your cut out Banner pieces 
4) using your Ebrush and a Black Sharpie - spray your Webs onto the Cardstock.  DO you love that!
5)  Now get those White Chipboard letters and let add some color.  I spray my with my Ebrush and a purple Sharpie - just love this idea.  I never have to purchase color letter again...
6)  Adhere your letter to the center of each Banner - add your ribbon to them.  
YOU are done!

Thanks for stopping by, IF you own a Ebrush, join our group on Facebook for more GREAT idea and helpful hints 


Terri Sproul 

Wednesday, October 15, 2014

Trick or Treat

It's time to Trick or Treat your way into your Art Journals...  Here is my treat for YOU
Trick or Treat your Way 

Group:  please join to win prizes:  All Thing Terri Sproul on FACEBOOK

Design Team Calls:  Creative Papeclay and Arnold Grummer 

Supplies:
Stencil:  Andy Skinner 
CottonWood Art Journal
Water
Dylusions
baby wipes
Sharpie - Black
Black Acrylic Paint
make up sponge
Gelatos
crow Stamps
Stamps:  Bottles - plate of stamps
India Ink
Cat Stamps - Maybe a Stampit Up stamp????
Trick or Treat Stamps
Spider:  From Stampotique.com
Splash Inks
Liqutex Ink

Here is your video class:  


Hope your join me next Tuesday Night....

Wednesday, October 30, 2013

Halloween Art Journal #2

Since we are just a few days away from Halloween, I had to play again with my Halloween Stamps, before I have to put them all away for another year...  sad face

Every Tuesday Night:  I do a Live show

First off I had to let Peg Rounds show off her new Line of stamps from SinCity Stamps - here is her blog where you can enter to win  their new line of Christmas Stamps:  CLICK HERE 


Supplies:
Golden : Glass Beads Gel
SinCity Stamps:  the Gravel yard stamps, Owl, etc
Ghost stencil - I made one with Quickuts Die
Mask from SinCity Stamps - these are brand new!
Splash Ink from Niji
Letter Stickers
Baby Whips
Stencil from Andy Skinner:  
Gelatos - you can purchase at AlteredPages.com 

here is the video class from Tuesday Night:


Thanks for visit me, join me again next Tuesday Night at
6PM PST
7PM MST
8PM CST
9PM EST

Thanks again everyone
Terri Sproul

Friday, October 11, 2013

SinCity Stamps Blog Hop

It's time for a blog Hop with SinCity Stamps and their Design Team. If You did not come from the SinCity Stamps Blog 
 please start there.


I receive a large wood frame that one of the local teenagers made in shop class.  I placed a piece of cardstock behind the window opening and trace the oval shape onto the cardstock.  Then I paint the wood frame with Black paints.  set aside to dry

Starting to like this so far.  need more stuff...


Supplies:
stamps:  all stamp have links to purchase
Pam Bray's Halloween collection:   - the Cobweb around the outside of the frame, Tree,  and the three ghost
Pam Bray's Halloween Collection #2  - I used the Owl/Moon, and one of the Bats
Skeleton Plate:   - I used the Fence and the Skeleton
Create a Pumpkin:   - I used the Grim Reefer


Stamp the cobweb with White ink - love the way that looks
I used a pop dot behind the bat, to give the piece some dimension.   


I hope you like my project,  NOW here is the important part, to be enter to win that plate of stamps - you must leave a comment on ALL the blogs, Like the facebook page for SinCity Stamps.  Now here is the rest of the team:  

Friday, October 4, 2013

Creative Paperclay Link Up Party

I Just love Halloween and Creative Paperclay® makes me happy.  Here is the project i made

The Dress is Made of Creative Paperclay®  she is about a foot tall.  I painted the doll form with black acrylic paint,  Roll out the Creative Paperclay® and press a few embossing folders into the wet clay to get the owl and spider webs.  While the clay was wet I add it to the dress form and let dry.  


I added real peacock feather and this cute little Owl

Love how the dress looks like a old tree.  I painted the dress with Burn Sierra Glaze and Black Acrylic paint.  


How I hope you VOTE for ME!  
Terri Sproul 


Thursday, November 17, 2011

How to make a scene with stamps

I know there are a lot of you that are scared of stamps and making a scene..  is just out of the question.  Here is a Halloween Scene I made using all Viva Las Vegastamps! and I made you a video.  This is the very basic on making scene.  No masking, No overlap...  all easy...  Hope this helps...  See all my video at Http://www.youtube.com/terrisproul  
If you are getting this post via the HIVE..  Sorry my video don't come over from my blog, don't know why.  Please check out my video on youtube.  link is above.  JUST FOR MY HIVE FRIENDS
  STAMPING A SCENE 101
WITH 
TERRI SPROUL


I had so much fun make this video and this scene for Halloween.  I plan on frame it next year and putting it on my Bathroom wall.  I have a large Halloween party each year.  Now to pack it up for next year.  Hope you think you can now make a scene with stamps.  Don't forget the best stamp company is Viva Las Vegastamps where I got all of these from...  GREAT price too..

TTFN
Terri Sproul

Tuesday, October 26, 2010

Last Minute and CHEAP Halloween Ideas


Halloween is just a few days away, and my house still need some love, but with Money tight this year I need to make some easy and CHEAP house Decor. So off to my studio!
Founds some of my stamps, and came up with this really easy project..
Candle:
I just stamp in Black with permitted ink onto transparency. Cut the image out (make sure you leave some transparency around the image to you can adhere to your candle.) This way you can remove the transparency and your candle is the same as you had it before. No need to purchase new candle for a one day celebration.
Frame:
almost the same as the candle, but I did not stamp onto transparency I just stamped onto white cardstock and added to a frame I already had in the house. Now I can remove the stamp image and use for another holiday.
Grave Stone
the grave stone was made using a grey piece of Chip Board. Stamp Letter using Letter stamps and the crow line on the top to add a little more to it.

Stamps are all from Stampotique

I hope you enjoy my simple, easy and cheap way to make your home a little more festive this Halloween season. so go pull out those stamps and see what you can make...

TTFN

Terri Sproul