Pages

Showing posts with label blog candy. Show all posts

Friday, October 11, 2013

SinCity Stamps Blog Hop

It's time for a blog Hop with SinCity Stamps and their Design Team. If You did not come from the SinCity Stamps Blog 
 please start there.


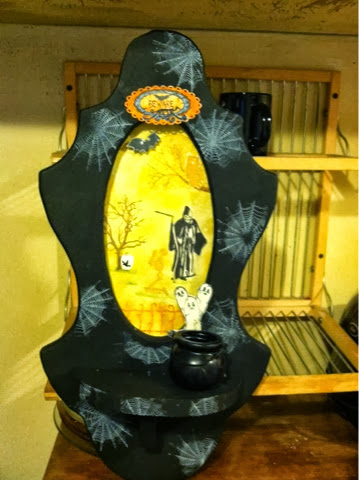
I receive a large wood frame that one of the local teenagers made in shop class.  I placed a piece of cardstock behind the window opening and trace the oval shape onto the cardstock.  Then I paint the wood frame with Black paints.  set aside to dry

Starting to like this so far.  need more stuff...


Supplies:
stamps:  all stamp have links to purchase
Pam Bray's Halloween collection:   - the Cobweb around the outside of the frame, Tree,  and the three ghost
Pam Bray's Halloween Collection #2  - I used the Owl/Moon, and one of the Bats
Skeleton Plate:   - I used the Fence and the Skeleton
Create a Pumpkin:   - I used the Grim Reefer


Stamp the cobweb with White ink - love the way that looks
I used a pop dot behind the bat, to give the piece some dimension.   


I hope you like my project,  NOW here is the important part, to be enter to win that plate of stamps - you must leave a comment on ALL the blogs, Like the facebook page for SinCity Stamps.  Now here is the rest of the team:  

Friday, May 3, 2013

Club scrap blog hop

Welcome to another amazing Blog Hop:  I was a member of ClubScrap Years and Years ago.  I forgot how amazing their paper's are. I hope you check out this Kit and consider becoming a monthly member of the club.  You get so much stuff in one kit, you could almost complete a scrapbook

 photo NSDbloghopbadge_zpsd75f52df.jpg

I love the color combo of this layout.  I made flowers on my weekly live stream show using all of the papers from this kit.  Here is link to watch the 3-D Flower Show.   CLICK HERE


See how cute these flowers are.  I love how this looks.  Also the texture I got when i add some of the other ribbons. 
Included in the 3-D Flower live stream I taught you how to make a Pin Wheel, and since all of Club Scraps papers are double side. this technique is perfect for it.  just love it.  Can you see the great match brads that were include in this kit too.  Wow.  Really, the only thing I added was die cuts machine to die cut the labels for the photo and some of the flowers.  Everything was included. 


I hope you enjoy my project and consider watch me on Tuesday Live Stream show.  
Now it's time to Hop on over to Roni Johnson Blog

Have a Creative Day
Terri Sproul

Thursday, April 11, 2013

Robin Nest Blog Hop


So excite, I love a Blog HOP.  So, Are you having fun so far???  Here is my Creative.
I started with a PaperMache  Face,  I ripped For Time and All Eternity Paper Into small pieces and adhere them onto the face using Mod Podge Sparkle.    Then I cute the Flowers and quote from "Love Me Glitter" and Adhere them also using Mod Podge.

I hand Drew in the Face and added Dew Drops to the center of all my flowers.  These flowers are hand cut from the Papers - Great tip, use your page as embellishment to save money. 

I fill the eye with 3-D Crystal lacquer from Sakura to give a realist look   Love that idea.. 

Here is a hanger I made using Glass Slides, ephemera, wire and UTEE, I made this on a show that I do on Tuesday Nights here is the Replay, Hope you join me on Tuesday Live, we have fun and have prizes and coupons.  Here is the REPLAY - CLICK HERE
 
I hope you enjoy my project.  I know I enjoy making it.  As you have read already we are doing 
so Blog CANDY, the only think you need to do to win on my blog is
LEAVE ME SOME LOVE (leave me a comment)
Here is the rest of the hop, just click on the next one.  thanks for join us today.  


Friday, March 1, 2013

Amazing Mold putty Blog Hop

It's a Blog HOP!  I love blog hops they are just too much fun.  I hope you enjoy them too.  So here is my project using Amazing Mold Putty and Amazing Casting Resin and some of the color additives from Alumilite.  
If this is your first stop, go back to the Amazing Mold Putty blog and start there.  CLICK HERE
It's A Color Tour!


This Box is made from 4 Match Boxes, and Chip board. 


Using the Amazing Mold putty I casted both the flowers and leave on top including the feet and handle for the draws


Love how the top of my box came out.


Can you see the detail you get with the Amazing Mold Putty 
I did make my own custom color by mixing both Blue and Red together to get this purple.  I did go over each of the blog and leaves with some Rub and Buff for bring out the highlights..
remember to leave me some LOVE and go back to the Amazing Mold Putty blog and tell us your favorite project to be enter to win.  
Now here is the rest of the team blogs


Thursday, November 22, 2012

Friday, November 2, 2012

Robin Nest/Helmar Design Team Blog HOP

Hello, my name is Terri Sproul, I have the pleasure of being on the Robin Nest Design Team.  I am excited to show off my project to you. 
Holiday Bird House


Put the whole house together with Helmar's 450, that's stuff rocks.  The amazing Christmas Paper's are all from The Robin Nest.  They have so many AMAZING Christmas Paper's it was hard to make up which ones I was going to use. 
Make sure you leave me some love (in a form of a comment) so you will be enter to win some BLOG CANDY!  Become a followers too please. 
Even the Birds have a home for this Holdiay
Back Side of the house..   


Saturday, April 21, 2012

Earth Day Blog Hop

Thanks for join the Robin Nest Earth Day blog hop..  You should have just hop on over from the Robin Nest Blog to see my project, if not make sure you see their post.  It's amazing...

I have been playing with Want2Scraps Chip board and knew it would be perfect to do my Earth Day project for Robin Nest.  I just adore Robin Nest Papers.

"Potholes"

Supplies
Robin Nest Papers: Getaway Glitter Cardstock 
Robin Nest Rubon - Family Tree
Wire
Vellum quote 
Cream Cardstock

Directions:
1) cover Want2Scrap chipboard with Robin Nest Paper's (so many to choose from).  using my Miracle tape.  
2)  covered frame to Globe with more Robin Nest papers...  
3)  On front of globe i rub-on "Sheltering Tree" (another amazing Robin Nest rub-on).  On Cream Cardstock I used "Tree" rubon from the same collections as the quote.
4)  Put globe together..
5)  Made my two embellishments (left and acorn) cover with embossing enamel from GlobeCraft Memories.
6)  add the vellum quote and I am done....
close up of the globe and the cool Rub-on from Robin Nest

  
My little embellishments...

Now here is the rest of the Robin Nest Hop.  we are give away some New Mini Dew Drop of each of our blog, so leave me some love...  

Sunday, March 11, 2012

USArtQuest Design Team Blog Hop

Oh, I just love blog hops..  and USArtQuest just came out with a new product..  How cool is that.  I am so excited to play with new products.
PRILLS

How fun are these...  Just think of all the stuff you can make..  Well here is what I made with them...  Can't wait to see what you make with them...  You can purchase them on the USArtQuest website or you can win some by leave us all a comment to be enter to win some..  LOVE BLOG CANDY!!!  and these look like candy..  smiles
 "Live Past Present"

I just love this project - here is the list of supplies
6" Tile with 2" x2" center cut out
Prills
Mica Color - Stargazer and Interference Palette
 HummingBird Stamp
PPA Gloss
Vellum Quote
Creative Paperclay®
Double Side Adhesive
Tissue Paper

Directions
1)  Hand made my Creative Paperclay® Flowers - set aside to dry.  Once they are dry I pained them with Startgazer "Meteor Copper" and then I added a small amount of PPA Gloss to the center of each of my flowers and added some Prills...Love the texture.
2)  Cut a piece of Double side Tape and added to the center of my Tile and filled with Prills.  Again love the texture...
3)  In my studio I had this amazing Tissue Paper with the image on it.  HAD to use.  I covered by Tile with PPA Gloss and applied by Tissue Image..  Then I added the Vellum quote again using my PPA Gloss
4)  Stamped Humming Bird image onto white cardstock and color the image using the Interference Palette.  Looks like a real hummingbird..  love it... cut out image
5)  Now I just place everything onto the tile and I was done..  This really looks great on the wall..  
Now Hop on over to the next blog.  All the links are here for you just in case you get lost..  


Tuesday, January 31, 2012

Love Cast in Clay blog hop.


Thanks for joining this amazing group of blogs.  This is two Design teams using both Amazing Mold Putty and Creative Paperclay® to create amazing project for you...
Here is my project.


My Steampunk ATC
I made a mold of both the heart and gear with my Amazing Mold Putty and then fill those molds with Creative Paperclay®
Now make sure you leave me some love and I know you are already a follower...  smiles...  thanks for stopping by... 

Saturday, January 7, 2012

WINNER!!!!! we love WINNERS!!!!

Time to announce the 
winner 
of the
GWYN
Congrats!!!!!!

Please contact me at
Terri@ultimatescrapbookretreat.com
to claim your prize...

Thanks for stopping by 
I had a blast on the 
Hop!
Love each and everyone of your comments!

TTFN
Terri Sproul

Saturday, December 31, 2011

New Years Day Blog HOP


Hope you just join me from the Viva Las Vegastamps! blog - if NOT Click Here

The Viva Las Vegastamps! Design Team would like to THANK everyone for stopping by this New Years Day Hop..  I hope your year is amazing...
I am very much into steampunk and Viva Las Vegastamps! has the BEST steampunk stamp our there.  and they LOTS of them.    So I had to make a streampunk creation.  here it is...

Mica Tile Streampunk Book

General Supplies: - each page I will link the stamp I used...
ALL STAMPS ARE VIVA LAS VEGASTAMPS!
Medium Size Mica Tiles - UsArtQuest
washer - hardware store
O rings from office supply store
Gears from Articus Studio
Clock is from Tim Holtz
Embossing Ink and embossing powders...

here are the inside pages with link to the stamp(s) I used.

cover
Stamps:
Steam #17444
Diva #17439


Stamps:

Passionate for Steampunk #17230


Stamp:

Ferris Wheel (one of my personal favorites)


Stamp:
Fantastic Flying Machine 


Stamps:
Steampunk Dragonfly


Stamps: sorry this one will not scan nice for me.  the mica colors are pick up... 


 Now it's time for some Blog Candy.  As you read already on the Viva Las Vegastamps blog, each of the teammate is give away $15 Shopping spree to the Viva Las Vegastamps! on-line store.  Also ONE person will win $30 Shopping Spree....  BUT YOU must leave a comment on EACH of the blog and BECOME a follower...  It's that easy...  You are entered....Best of luck....

Thanks for stopping by, I hope your year is full of creating projects with us.

Terri Sproul


Thursday, December 1, 2011

12 tags of Christmas #2

Thanks again for join us on this 12 Tags of Christmas Blog Hop - I hope you are having fun with all of us.. Have you been over the the Viva Las vegastamps! on-line store yet???  
As soon as I seen this stamp with Santa checking his list twice - I knew I had to use that "coal again" stamp!

Here is a list of stamps you will need.
Coal Again
Santa Reading list

Now here is the video on how I made this tag.  Super easy... enjoy and for my Hive friends Click Here

 
  Now it's time for you to leave me a comment and then head on over to Lea Blog and leave her a comment - I hope you win this set of stamps. 

Merry Christmas
Terri Sproul

Sunday, October 30, 2011

Robin's Nest Design Team Blog Hop

Welcome to my blog, my name is Terri Sproul, I have the honor of working with not just Robin's Nest but all of these amazing blog artists...  We are doing a Harvest/Halloween Blog hop today with Blog candy...  I think you already know the rules..  You much leave a comment on all of the blogs in this hop and become a follower of each of them..  It's that easy..  DID you start at the beginning?  If not here is the link

I made you a shadow Box for Halloween. 


Supplies:
Scary,Scary oh so scary Rub-on
Black Glitter Spiderweb Cardstock 
Glitter Black and White Swirls 
Glitter Black and White Fleur-di-Le
Shadow  Box
Flower Stamp:  Viva Las Vegastamps!
Spider Stamp:  Stampotique
Inks:  Stewart Superior
3-D Crystal lacquer
Here is a video on how to make those 3-D flowers from Robin's Nest paper's - this video is using plan white cardstock  - But I made these flowers on this project using the same technique.

Close up of flower for you....

Please feel free to see more of my "how to" video on my Youtube Channel - CLICK HERE.


Here is the list of the rest of the blogs on this Hop - remember you must become a follower of ALL the blog and leave us a comment and we will pick a winner on each blog to recieve $15 toward the Robin Nest Store and one Grand Prize winner to win $50 to the store....  leave us some love.  Stop back by the Robins Nest Blog on Sunday Nov 6th to see if you won.


Thanks for stopping by....
TTFN
Terri Sproul

Friday, October 28, 2011

Steampunk Blog Hop

Photobucket

 Glad you join us on our Blog Hop...  I adore - did I say Adore - STEAMPUNK...  


Here is my first project I made it's a MINI - very Mini steampunk book
Here is the book cover
This is the inside of my mini book


Supplies:
All stamps are from Viva Las Vegastamps!
Glass Tiles:  1" x 2" from Sakura
3-D Crystal Lacquer
Small Gear
Inks:  Lots of Brown and light blue, olive, plum.....
Cream Cardstock

Directions:
1)  Cut cardstock to 2" x 8" - Start stamping steampunk images using different shade of brown, add a little "olive", "purple" and "blue" in there....  
2)  after you are done with all the stamping for the inside - score the paper every 1" across...  According fold....  
3)  Stamp more steampunk image on what would be the cover of your book.  I used my 3-D Crystal Lacquer to adhere my Glass Tile to my front and back cover.  Adhere small gear to side to look like a closure (it's not - just for look) - used my Crystal lacquer for my adhesive...

If you have  a question on this project let me know...  

Tuesday, June 28, 2011

Viva Las Vegastamps! Blog Hop

Thanks for join me and the rest of the Viva Las Vegastamps! Design team for this hop. I know we are so excited for you to stop by our blogs. Well you should have just hop over from the Viva Las Vegastamps! blog - if not click the link - As you may have read we are doing Blog Candy - It's a "pound o Rubber" - this is an amazing deal. Each of DT member got one for our first month on the team. What a great deal. Hope you stop by the store and check it out... CLICK HERE...
HERE Is the important part: to be enter to win the Blog Candy - you must become a follower of all of the blogs on the blog hop and leave a comment... it's that easy!

I made you guys a video for my post today. I love make "how to" video - you can see more of my video on the Viva Las Vegastamps! website and my Youtube Channel.

supplies using in video project: Order your today from the on-line Viva Las Vegstamps store

Swirl Stamps: Viva Las Vegastamps!
Ultra High Gloss Embossing Powder: Viva Las Vegastamps!
Heat Gun: you can order from Viva Las Vegastamps!
Tidy Tray: you can get one at Viva Las Vegastamps
Tissue Paper - I got mine with my stamp order from viva las Vegastamps!
Teflon Sheet: Viva Las Vegastamps!

Memories Mist: color of choose - Stewart Superior
glass Jar: 99 cent store


Here is a list of all the blog - just in case you get lost... But your next stop is Chris Hurley Blog:

1) VLVS - Blog
2) Terri Sproul blog: http://www.terrisproul.blogspot.com
3) Chris Hurley blog; http://www.stinkydogdesigns.blogspot.com
4) Kim Prince:http://www.creative-diversions.blogspot.com/
5) Rebecca Parsons: http://www.cre8tivecompass.com
6) Joe Morgan: http://www.createncraft.com/author/jmorgan
7) Dee Dee Catron: http://www.umwowstudio.com
8) Jennifer Bliss: http://www.blissfulplace.blogspot.com

Thanks for stopping by - remember to become a follower of my blog and leave me a comment. We will be checking - Hope you are the winner!

TTFN
Terri Sproul